In part three we went through how to use liblvgl-sdl2-dev to run LVGL on a desktop.
That's useful to quickly get started with LVGL during development but there's another use-case which is directly tied to
the different embedded devices LVGL runs on.
The Renesas RZ/G2L has native Ubuntu support, which means the same apt install can be used there too.
In this blog post I'll take you through the steps to get LVGL's 3D truck demo running on the board's Mali GPU.
Since LVGL is ready to be installed via apt we won't have to build LVGL, meaning that we can skip a cross-compilation environment.
The supported Ubuntu image on this device is the Server version, so we won't get a desktop environment. We don't need one anyway, because we'll drive the GPU directly via DRM.
From a Booted Board to the Truck Demo#
These commands need to be run on the board itself, over SSH or on the serial console. If you don't have Ubuntu on it yet, skip ahead and come back.
1. Install the build tooling
sudo apt update
sudo apt install software-properties-common build-essential cmake gitsoftware-properties-common provides add-apt-repository, build-essential gives you a compiler.
2. Add the two PPAs
sudo add-apt-repository ppa:ubuntu-on-renesas/public-ppa
sudo add-apt-repository ppa:lvgl/lvglThe first one carries the Renesas GPU driver, the second is LVGL's own PPA from part three.
3. Install the GPU driver and LVGL
sudo apt install libmali-renesas-rz-g2l-g2lc liblvgl-drm-3d-devliblvgl-drm-3d-dev is the DRM build of LVGL with 3D enabled, and libmali-renesas-rz-g2l-g2lc is the userspace
driver for the board's Mali GPU. Both are prebuilt ARM64 packages, so this step simply downloads them without building anything.
4. Get the Linux port
git clone https://github.com/lvgl/lv_port_linux.git
cd lv_port_linux
git checkout bacde48d98949689379f70ca7fa471bd270613a5Here I'll be using lv_port_linux, which is the reference project for LVGL on
Linux: it provides you with display and input selection, and a quick way to get started with a full LVGL application.
5. Build the demo
cmake -B build -DCMAKE_BUILD_TYPE=Release -DLVGL_USE_INSTALLED=ON -DCONFIG_LV_USE_DEMO_TRUCK=ON
cmake --build build -j$(nproc)LVGL_USE_INSTALLED=ON is the important flag: it tells the project to pick up the LVGL that apt installed instead of
building the copy in its own submodule. CONFIG_LV_USE_DEMO_TRUCK=ON selects the 3D truck demo.
6. Run it
./build/bin/lvglsim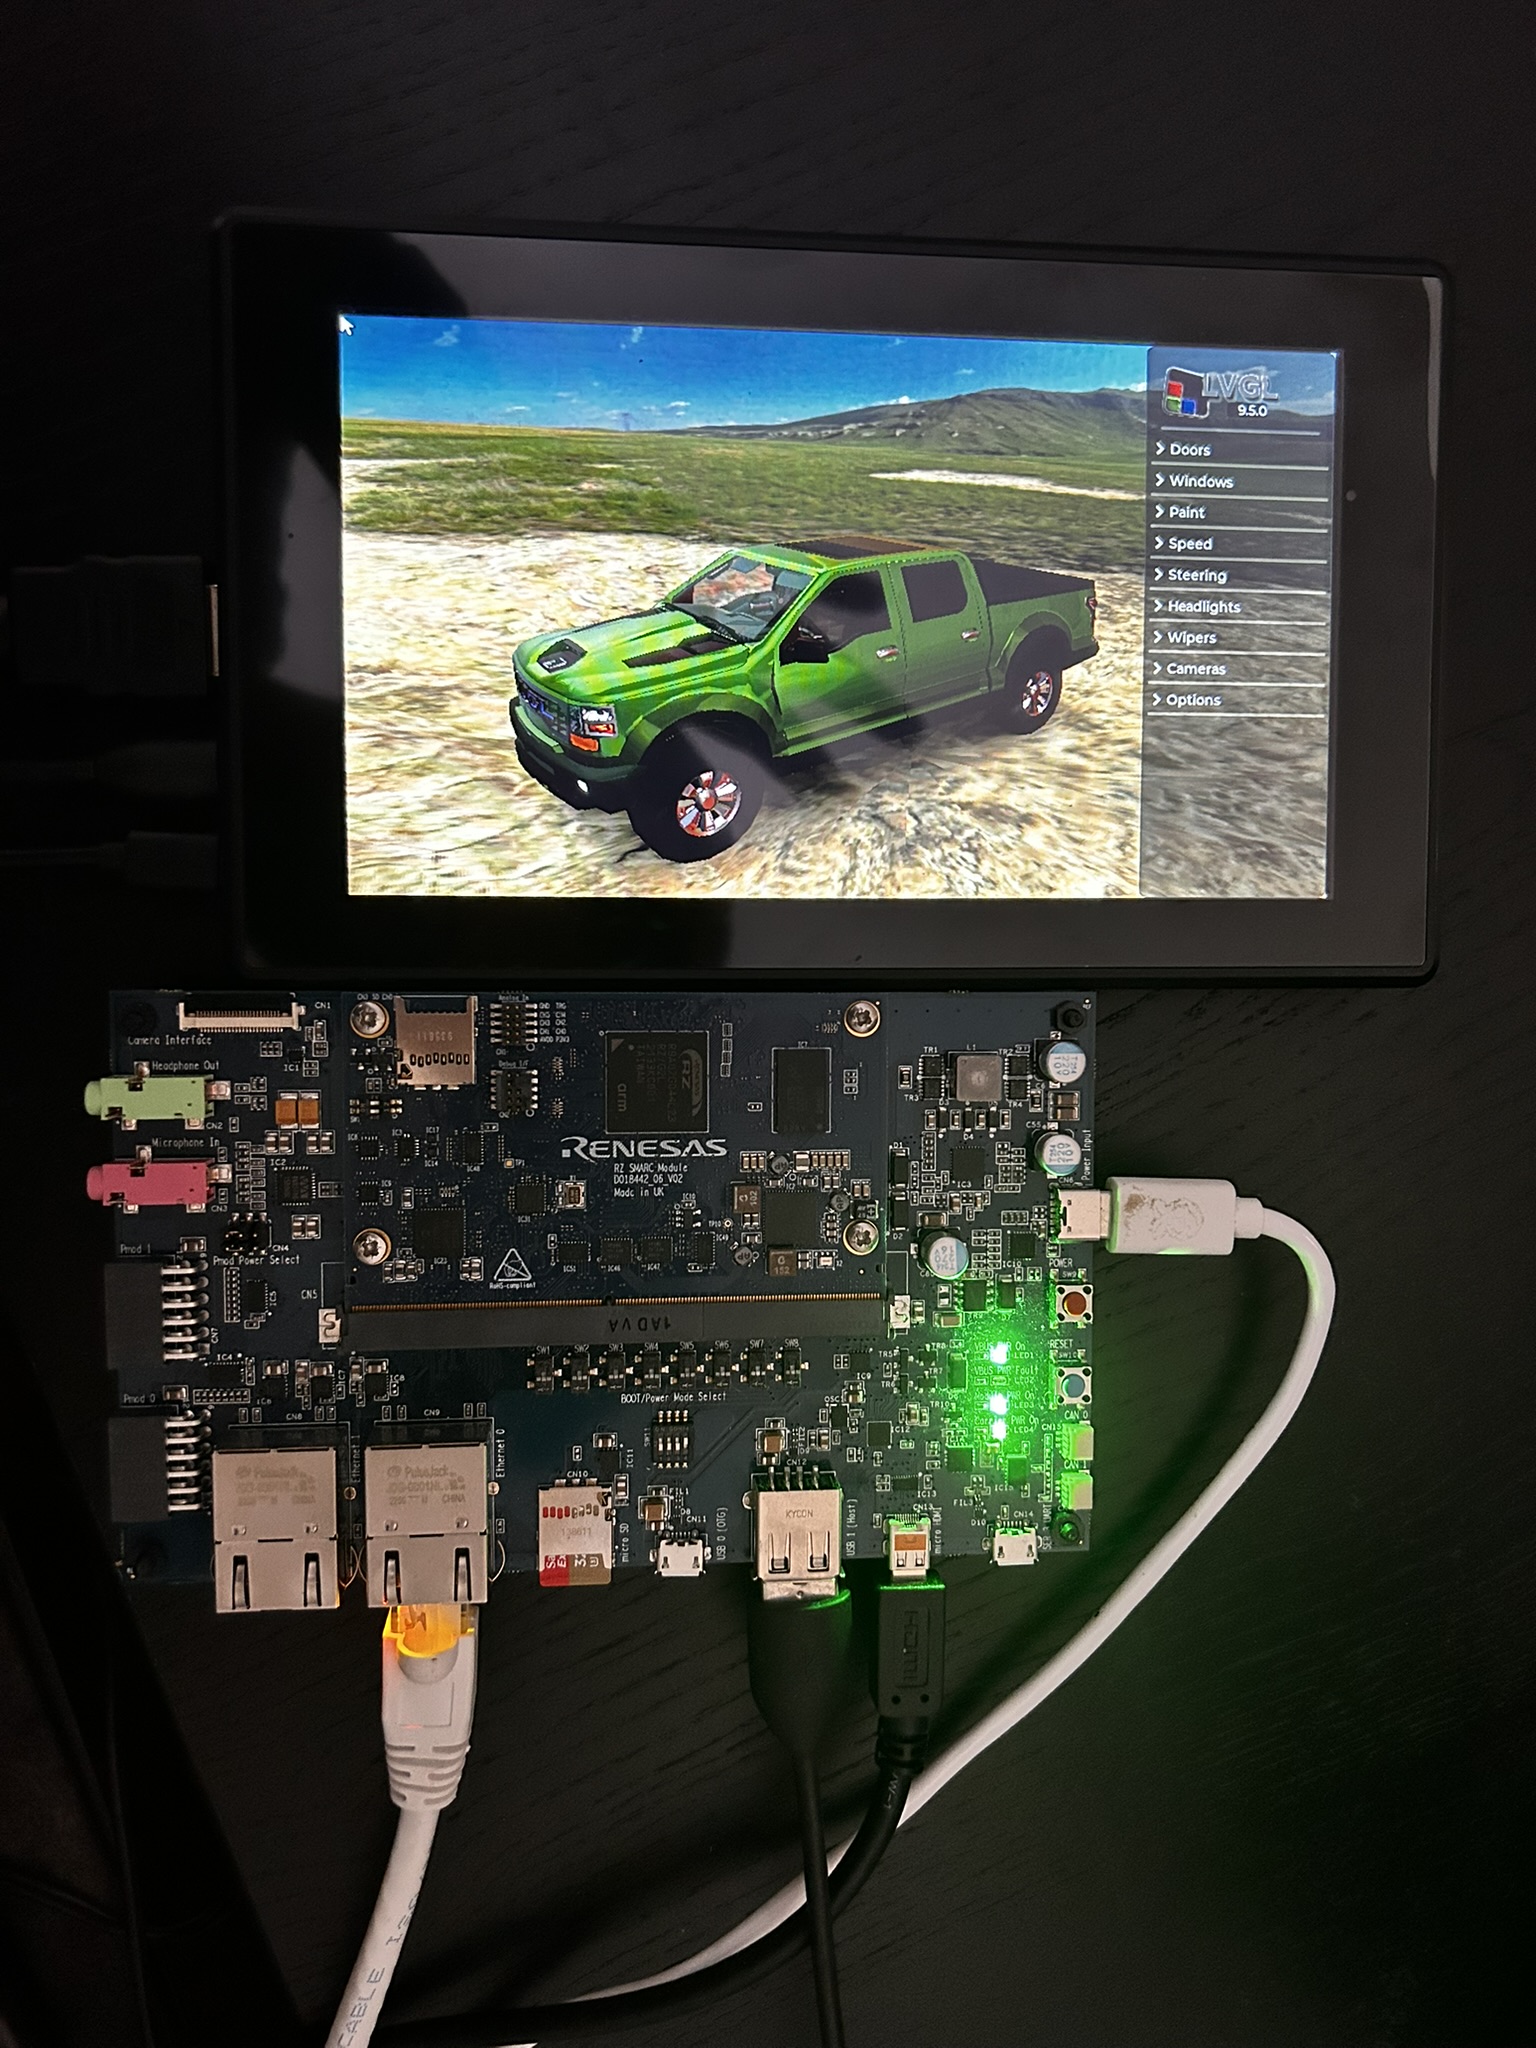
That's a 3D model rendered on the GPU, at around 30 FPS at 1024x768.
The demo renders without any special permissions. If you need input support, you need to add your user to the input group:
sudo usermod -aG input $USERThen log out and back in (or run newgrp input in the current shell).
Setting Up Ubuntu#
Canonical publishes Ubuntu images for Renesas IoT boards, the RZ/G2L included:
- ubuntu.com/download/renesas-iot for the images
- Quick start guide to RZ/G2L with classic Ubuntu images (PDF) for flashing an SD card and first boot
The RZ/G2L doesn't have enough RAM to run a full GNOME desktop smoothly, so pick Ubuntu Server. You don't need one here anyway. LVGL renders directly to the display through DRM/KMS, and its 3D rendering goes through EGL on the same path.
There is no Wayland compositor or X server anywhere in this stack.
Once it boots and you have a shell, go back and follow the steps above to run the full application.
apt for Deployment#
A prebuilt package is a developer convenience, because it avoids compiling a dependency. Here we use it to deploy a library on the target device directly, and since we have a compiler on the target, we can compile the application there too.
LVGL publishes ready-to-download packages for both x86_64 and ARM64, so here we run the same .deb files, from the same PPA,
that we used in part three on a desktop. What changed is which package: liblvgl-drm-3d-dev instead of liblvgl-sdl2-dev,
because the board has no desktop to open a window on. The 8 published packages exist precisely so this swap is one word on one line.
Compiling Directly on the Target Board#
Usually, an application like this would get cross-compiled from the host system using a cross toolchain, a sysroot with the target's headers and libraries, a CMake toolchain file and a copy step at the end. This setup works and can of course be used, especially if you want to deploy your application with an LVGL configuration tailored for your needs.
In this case all of these steps were skipped. Since we are running Ubuntu, we can just install a compiler directly on the target, and since LVGL is already prebuilt, we don't need to worry about compiling the full library on a dual-core Cortex-A55, as building the application takes less than 20 seconds:
$ time cmake --build build -j$(nproc)
[  6%] Building C object demos/lv_demo_truck/CMakeFiles/lv_demo_truck_ui.dir/lv_demo_truck.c.o
[ 13%] Building C object CMakeFiles/lvgl_linux.dir/src/lib/driver_backends.c.o
...
[100%] Linking CXX executable bin/lvglsim
[100%] Built target lvglsim

real 0m17.127s17 seconds to be precise.
Note that compiling LVGL itself on this board would be a different conversation.
Wrap Up#
This blog post wraps up the LVGL building and installation saga. First we looked into how LVGL can now
fetch its own dependencies, then to
write down what it linked against, which is what made a
correct .deb possible. We finish where LVGL runs best, on a real embedded device.
If a package misbehaves, or you'd like to see LVGL published for another board or configuration, open an issue at github.com/lvgl/lvgl/issues.
- Getting Started with LVGL v9.6 with 50 Lines of Code
- Installing LVGL, Dependencies Included
- apt install lvgl
- 4LVGL with Ubuntu on the RZ/G2LYou are here