If you've worked with 16-bit color displays, you've likely encountered ugly color banding in images with smooth gradients. The 65,536 colors available in RGB565 format often aren't enough to represent subtle transitions. Fortunately, dithering solves this problem by creating the illusion of greater color depth through clever pixel manipulation.
What is Dithering?#
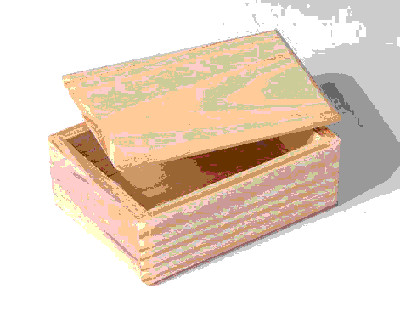
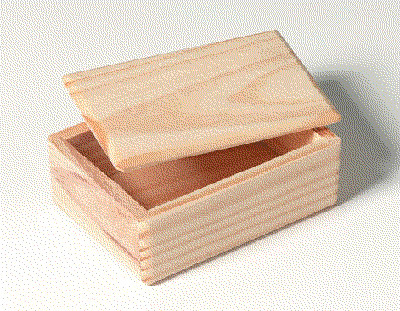
Dithering is an image processing technique that gives the appearance of greater color depth by strategically arranging pixels. Both images below use only 256 colors, but the dithered version on the right looks significantly smoother.
Why Use Dithering on Embedded Systems?#
On embedded systems, 16-bit color depth (RGB565) is extremely common because it requires much less memory and fewer data lines than 24-bit color. For most use cases, there's no noticeable difference in quality. The exception is smooth color gradients, where 16-bit displays simply don't have enough colors to create seamless transitions.
Dithering solves this problem at compile time with zero performance impact at runtime. You convert your images once during development, and they display smoothly on the target hardware.
How Dithering Works in Practice#
The concept is simple: imagine creating gray from only black and white pixels. By alternating black and white pixels, the human eye perceives an average gray color. Use more white pixels for lighter gray, more black for darker gray.
Real dithering algorithms are more sophisticated, tracking quantization errors after placing each pixel and applying various techniques to avoid visual artifacts.
For a deep dive into dithering algorithms, see Image Dithering: Eleven Algorithms and Source Code by Tanner Helland.
Visual Comparison#
Original 24-Bit Image#
Original Enlarged#

16-Bit Without Dithering#
16-Bit Without Dithering (Enlarged)#

16-Bit With Dithering#
16-Bit With Dithering (Enlarged)#

How to Dither Images for RGB565#
The easiest way to convert your 24-bit images to dithered 16-bit format is using photo editing software. Here are two recommended approaches:
Method 1: GIMP (Recommended)#
GIMP is a free, cross-platform image editor.
GIMP requires a plugin for RGB565 dithering. Download the plugin from the GIMP registry or use this mirror if the original link is unavailable.
Installation steps:
- Copy
dither16bit.scmto GIMP's scripts directory (on Linux:/home/user/.gimp-*/scripts) - Copy the four grayscale palette files (
*.gpl) to GIMP's palettes directory (on Linux:/home/user/.gimp-*/palettes)
To apply dithering:
Open your image in GIMP and select Image > Mode > Dither to RGB565, then save the result.
Method 2: ImageMagick (Command Line)#
ImageMagick is a powerful command-line image processing tool with support for many dithering algorithms.
To dither an image, run:
convert image_in.jpg -ordered-dither o8x8,32,64,32 image_out.jpgBonus: Black and White Dithering#
For monochrome displays (like high-DPI e-paper or OLED screens), you can create 1-bit dithered images in GIMP:
- Open your image
- Select Image > Mode > Indexed
- Choose Use black and white color palette as the Colormap
- Select Floyd-Steinberg as the Color Dithering method
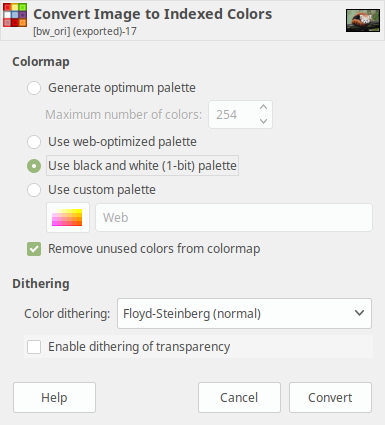
Here's a comparison of the results:
Using Dithered Images in LVGL#
Once you have a dithered image, you can use it in LVGL like any other image:
- Upload your dithered BMP, JPG, or PNG to the LVGL Online Image Converter
- The tool generates a C array from your image
- Copy the resulting C file to your project
- Display the image using an LVGL image object
Conclusion#
Dithering is a simple yet effective technique for achieving smooth gradients on 16-bit displays. By converting your images during development, you eliminate color banding without any runtime performance cost. Whether you're working with RGB565 displays or monochrome screens, dithering can dramatically improve your visual quality.